Deploy IDrive® 360 via Jamf Pro
Using the IDrive® 360 mass deployment package, remotely deploy the application on multiple Mac computers or groups via Jamf Pro.
Deploy IDrive® 360 package
Prerequisites for remote deployment:
- Login and download the IDrive® 360 mass deployment package. Alternatively, click the ‘Copy Link’ button to copy the installation link.
- Jamf Pro software
To deploy the IDrive® 360 package to Mac,
Prepare the Customized IDrive® 360 deployable PKG
The default IDrive360 folder must be packaged into a format that is deployable by Jamf Pro. This can be done using the Jamf Composer tool.
Login and download the IDrive® 360 mass deployment package
Steps to register a set of computers under a particular group or with a Private Key encryption method
Admin may choose to register a set of computers under a particular group or with a Private Key encryption method during the mass deployment.
The installation requires configuring a .plist file and installing it along with the IDrive® 360 mass deployment package.
The com.idrive360.packageinstaller.plist file can contain the following keys:
Key Value Description DefaultgroupName String Machine registers under this particular group No groupencryptionKey String Machine registers with this private encryption key No encryption keyconfigurationID String You can find this parameter in your IDrive 360 account No configuration IDtrayHidden Number 1 - Enabling this option will prevent users from accessing the tray options on their computers
0 - Unhide tray and allow users to access tray options 0deviceTag String Machine registers under this tag No Tag- Click here to download a sample com.idrive360.packageinstaller.plist file.
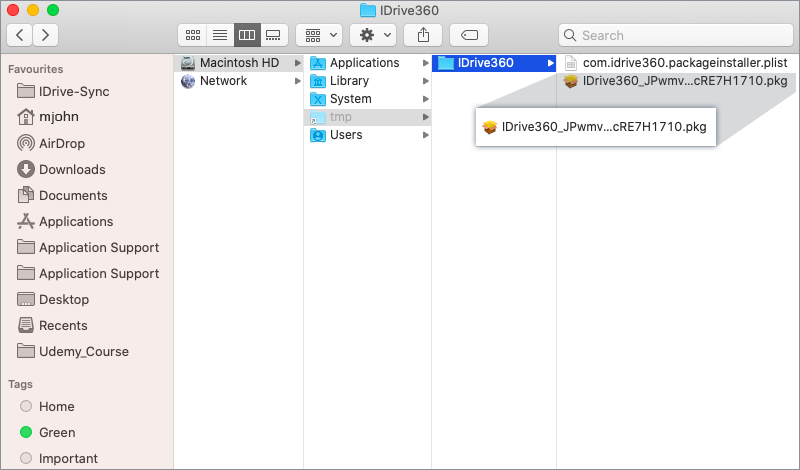
- Go to /tmp directory and create one folder called IDrive360, place “com.idrive360.packageinstaller.plist” and IDrive360 package(IDrive360_<token>.pkg) into it.
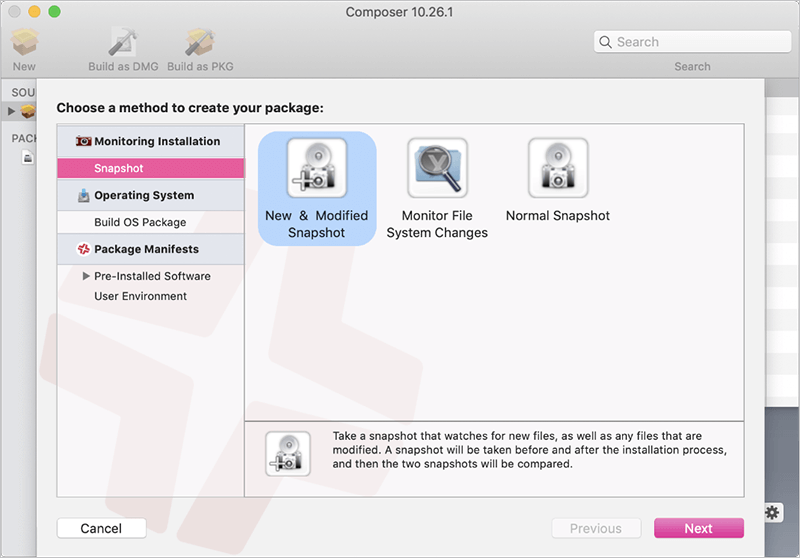
- Open Jamf Composer on your machine and log in if prompted. (If you receive a prompt to choose the method for creating your package, click 'Cancel'.)
- Drag and drop the IDrive360 folder from /tmp directory into the sidebar of the Composer under 'Sources' and it should appear as one source.
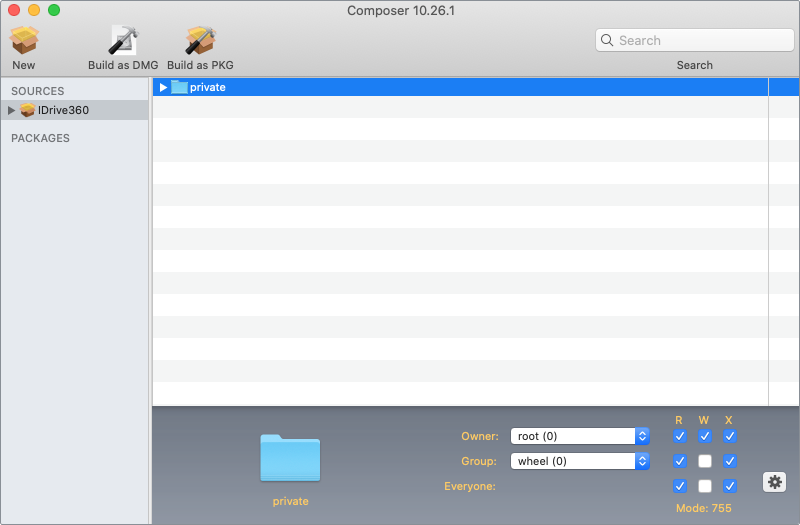
- Next, adjust the ownership and permissions of IDrive® 360 to match the private folder by selecting the private folder in the center window and using the gear icon and selecting 'Apply Permissions to Private and All Enclosed Items'.

- Click 'Build as PKG' and choose 'Desktop' to save the IDrive360.pkg on the desktop.
Upload the PKG to Jamf Pro Dashboard
- Login to Jamf Pro in the browser.
- Add the target computers to Jamf Pro by installing Jamf Profile in all the target computers using the provided Jamf Pro enrol link.
- In the top-right corner of the web page, click 'Settings'.
- In the 'Computer Management' section, click 'Packages'.
- Click 'New'.
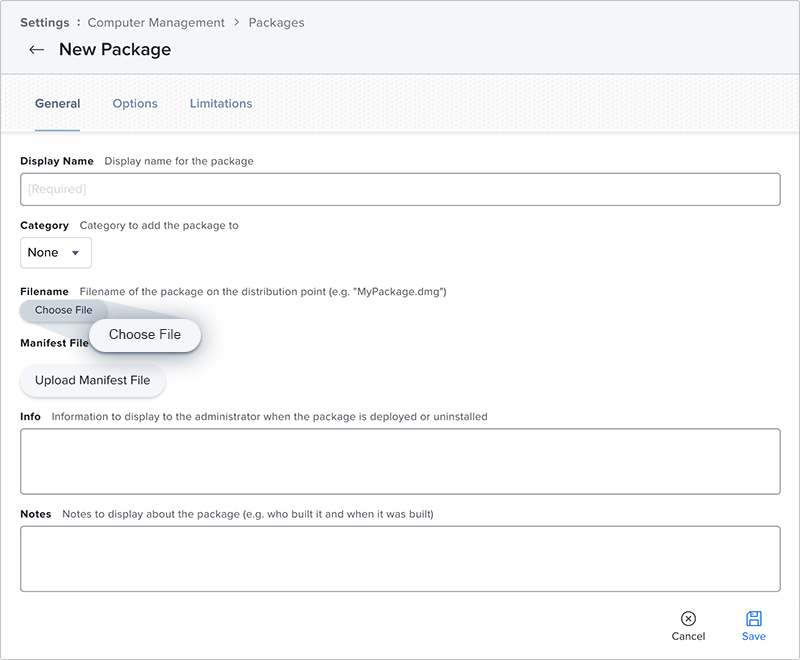
- Under the 'General' pane, in the Filename section click 'Choose File' and select the IDrive360.pkg from the desktop, which was created earlier using Jamf Composer.
- Click 'Save' to upload the package.
Note: It is recommended to use the unique package name to avoid any error while uploading.
Add installer script
- In the 'Computer Management' section, click 'Scripts'.
- Click 'New'.
- Enter Display Name 'IDrive360InstallerScript' under 'General' pane.
- Go to the 'Script' tab and copy paste the below code:
							#!/bin/bash

						   PACKAGE_NAME=$4

						   PACKAGEPATH=/tmp/IDrive360/$PACKAGE_NAME

						   if [[ "$PACKAGE_NAME" == "" ]]; then

						   echo echo "Enter the complete package path"

						   fi

						   sudo installer -pkg $PACKAGEPATH -target /

						   if [ -d "/tmp/IDrive360" ] ; then

						   rm -rf "/tmp/IDrive360"

						   echo "Deleted IDrive360 from tmp folder"

						   fi

						   exit 0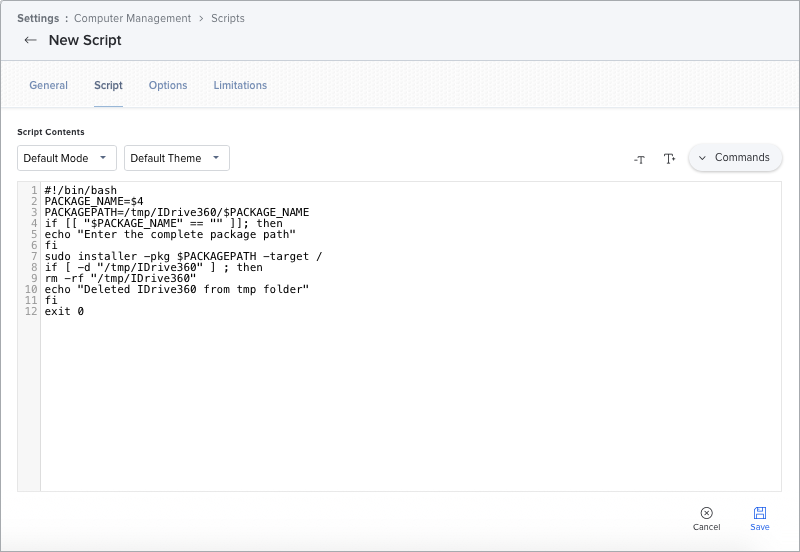
- Go to the 'Options' tab and put 'IDrive360 Package Name' as a label in 'Parameter 4'.
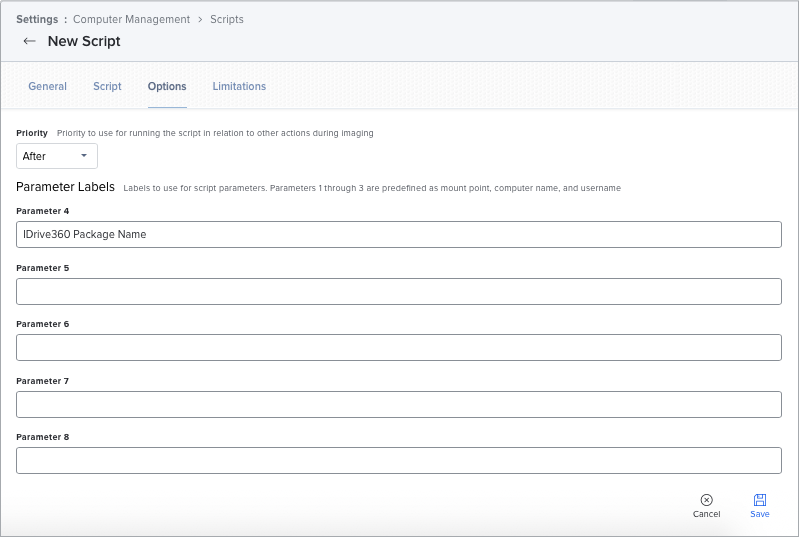
- Click 'Save'.
Enable Full Disk Access and Apple Events via Jamf Configuration profile.
Follow the steps below to enable full disk access for IDrive® 360 and apple event from the Jamf Pro Dashboard:
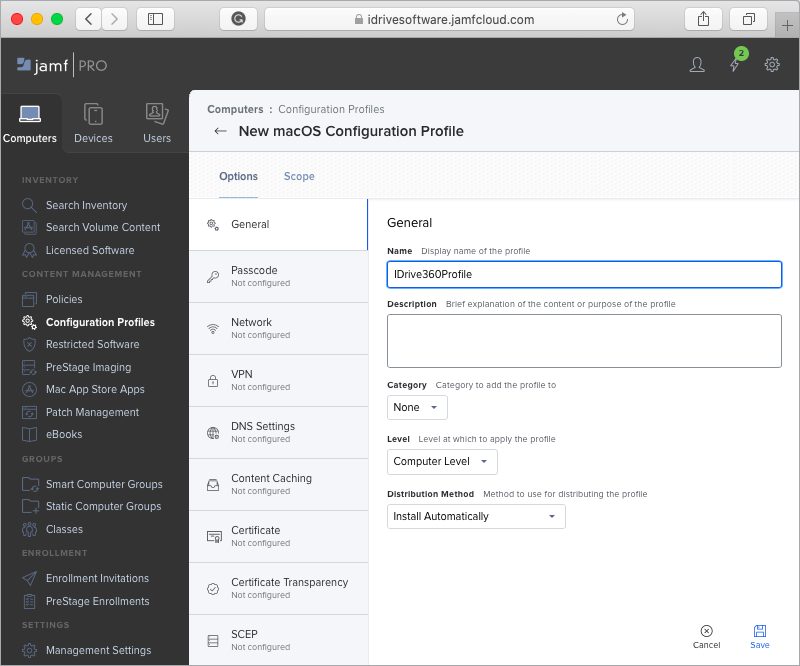
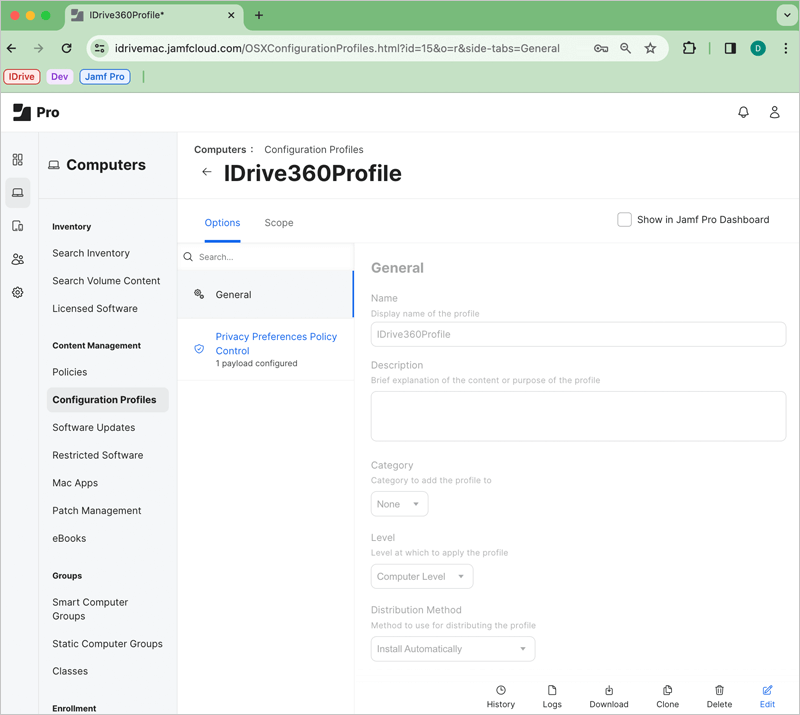
- Login to Jamf Pro and Navigate to 'Configuration Profiles' under the 'Computers' tab.
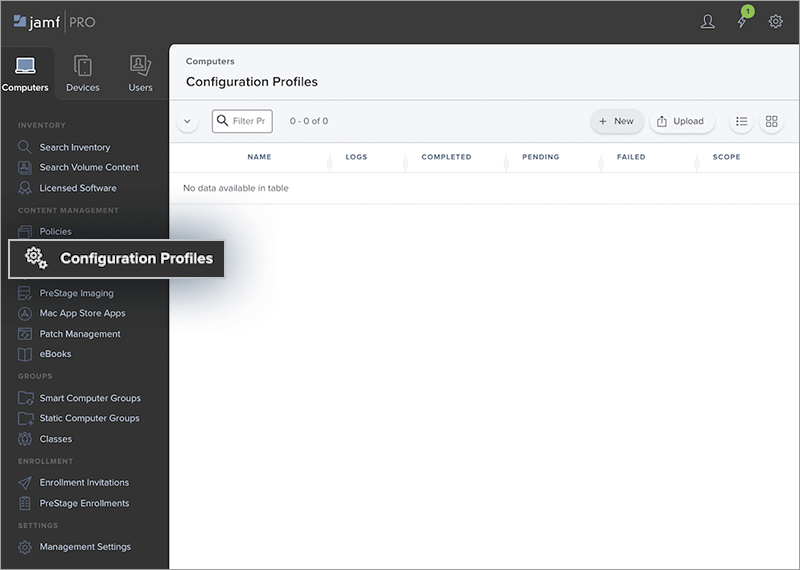
- Click the '+ New' button and enter a profile name (e.g. IDrive360Profile).
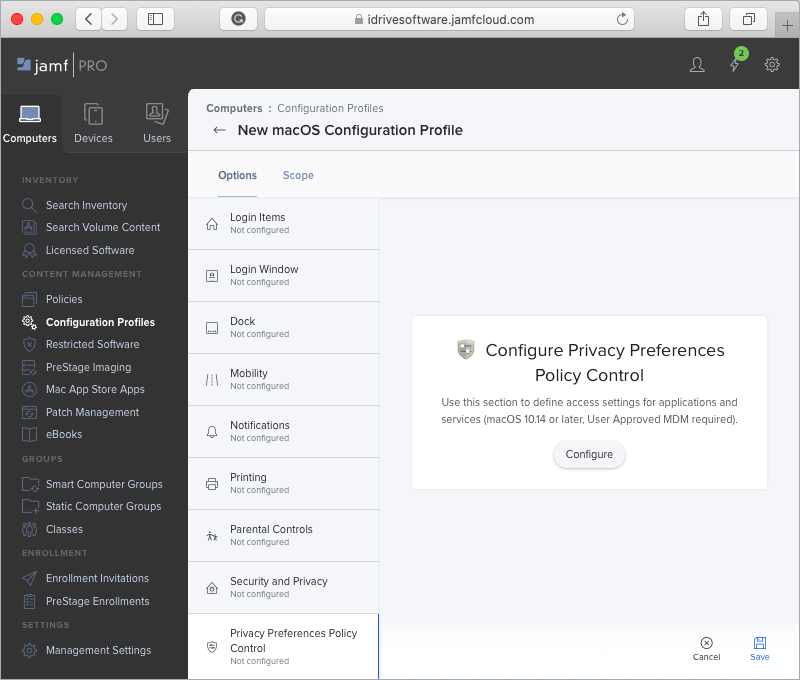
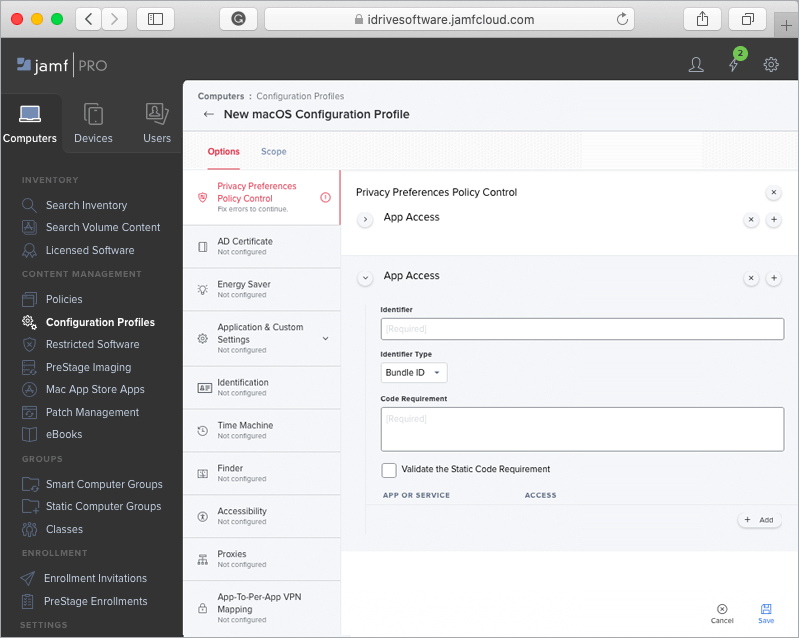
- Go to the 'Privacy Preferences Policy Control' tab, and click 'Configure'.
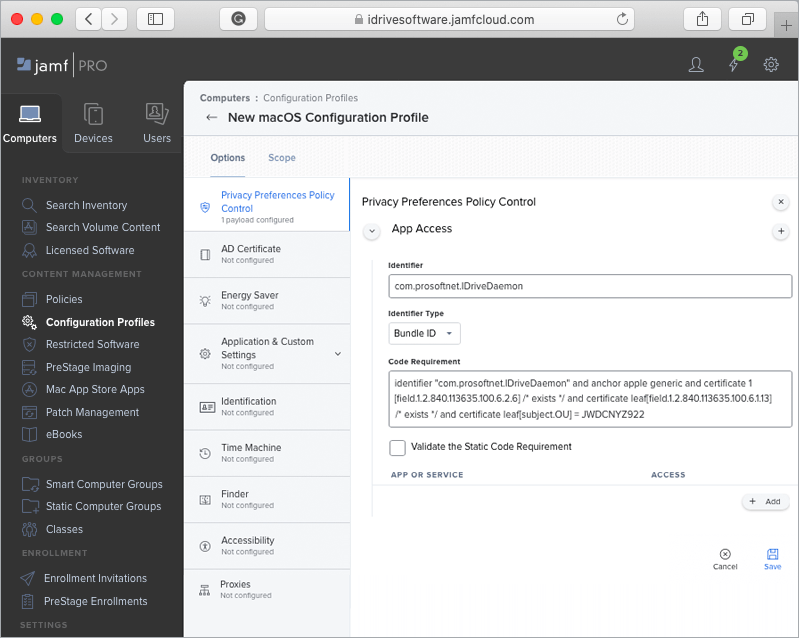
- In the 'App Access' section, add the below values:
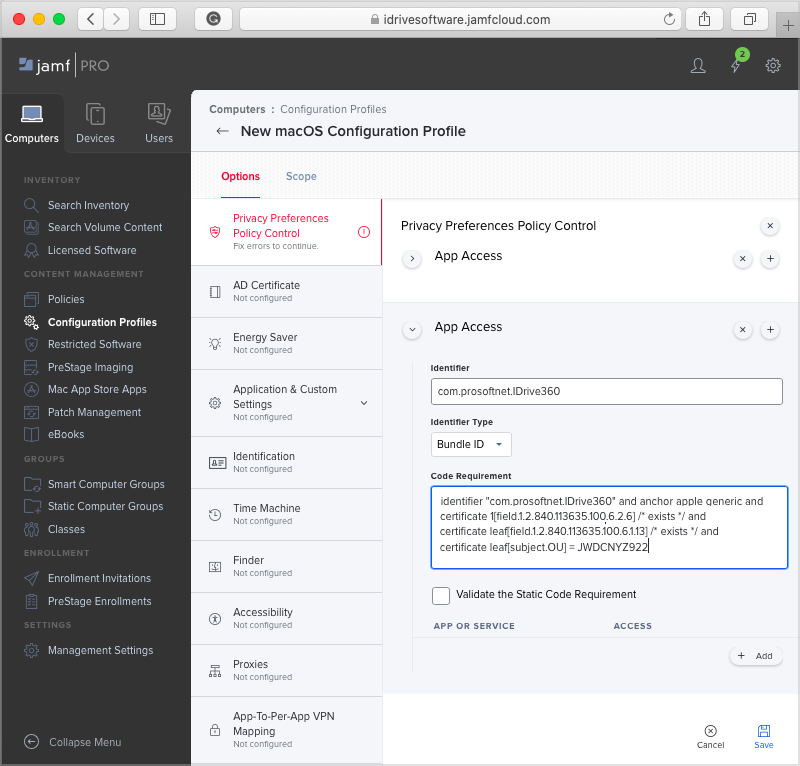
Identifier: com.prosoftnet.IDriveDaemon
Identifier Type: Bundle ID
Code Requirement: identifier "com.prosoftnet.IDriveDaemon" and anchor apple generic and certificate 1[field.1.2.840.113635.100.6.2.6] /* exists */ and certificate leaf[field.1.2.840.113635.100.6.1.13] /* exists */ and certificate leaf[subject.OU] = JWDCNYZ922
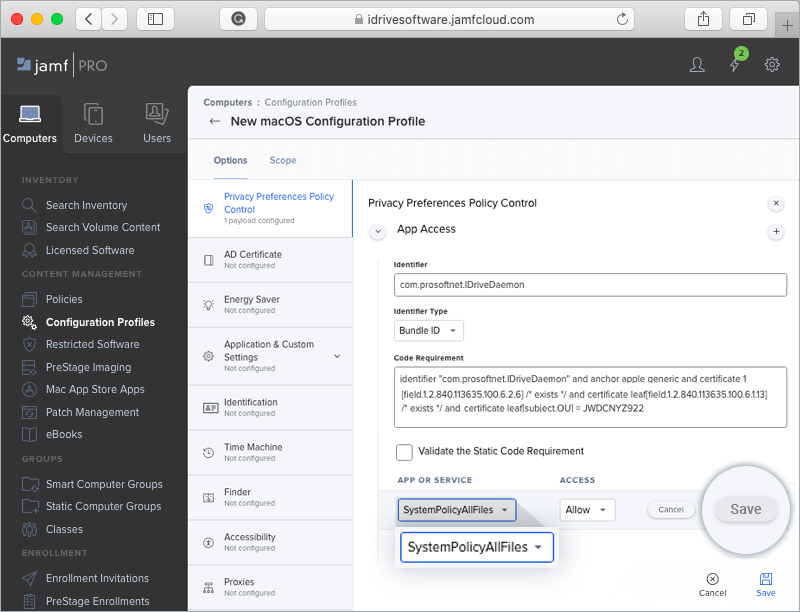
- Click the '+ Add' button and select 'SystemPolicyAllFiles' from the drop-down list.
- Click 'Save'.
- Click the '+' button on the top right corner to add new App Access.
- In the 'App Access' section, add the below values:
Identifier: com.prosoftnet.IDrive360
Identifier Type: Bundle ID
Code Requirement: identifier "com.prosoftnet.IDrive360" and anchor apple generic and certificate 1[field.1.2.840.113635.100.6.2.6] /* exists */ and certificate leaf[field.1.2.840.113635.100.6.1.13] /* exists */ and certificate leaf[subject.OU] = JWDCNYZ922
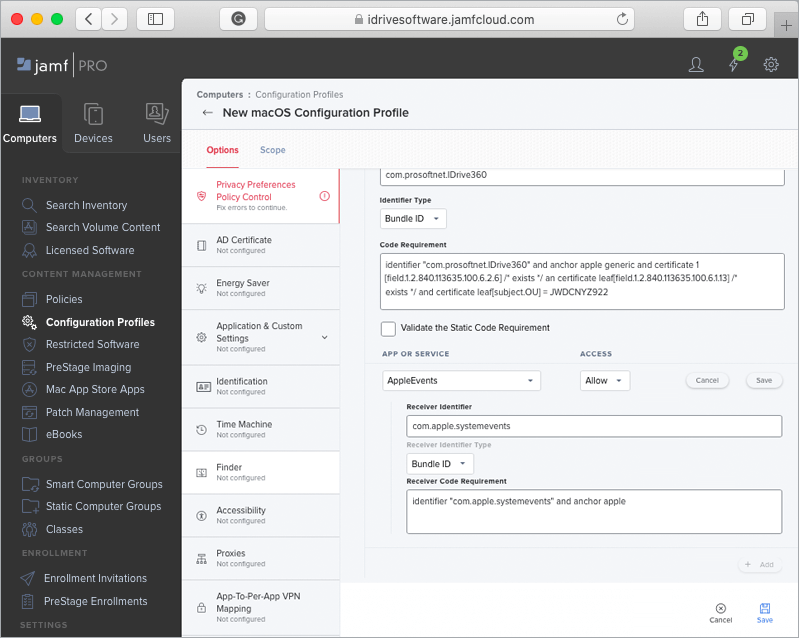
- Click the '+ Add' button and select 'AppleEvents' from the drop-down list. Add below values:
Recelver Identifier: com.apple.systemevents
Recelver Identifier Type: Bundle ID
Recelver Code Requirement: identifier "com.apple.systemevents" and anchor apple
- Click 'Save'.
- Navigate to the 'Scope' tab. From the 'Target Computers' and 'Target Users' drop-downs, select 'All Computers' and 'All Users' respectively.
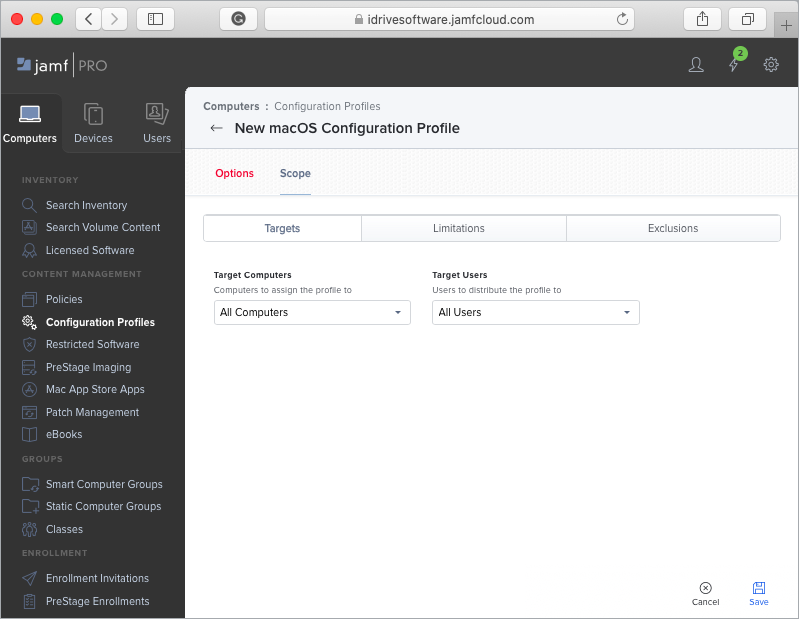
- Click 'Save'.
- Click the 'Logs' button to view the configuration profile installation status on all computers.
- Login to Jamf Pro and Navigate to 'Configuration Profiles' under the 'Computers' tab.
Allow in the Background
- Login to Jamf Pro and Navigate to 'Configuration Profiles' under the 'Computers' tab.
- If you have an existing configuration profile, click ‘Edit’ to add the ‘Managed Login Items’ option to the profile.
If you do not have an existing configuration profile, click '+New' and enter a profile name (e.g., IDrive360Profile)
- Click 'Managed Login Items'
- Under 'Settings', specify these rules for managing login items:
Rule type: Bundle Identifier
Rule Value: com.prosoftnet.IDriveDaemon
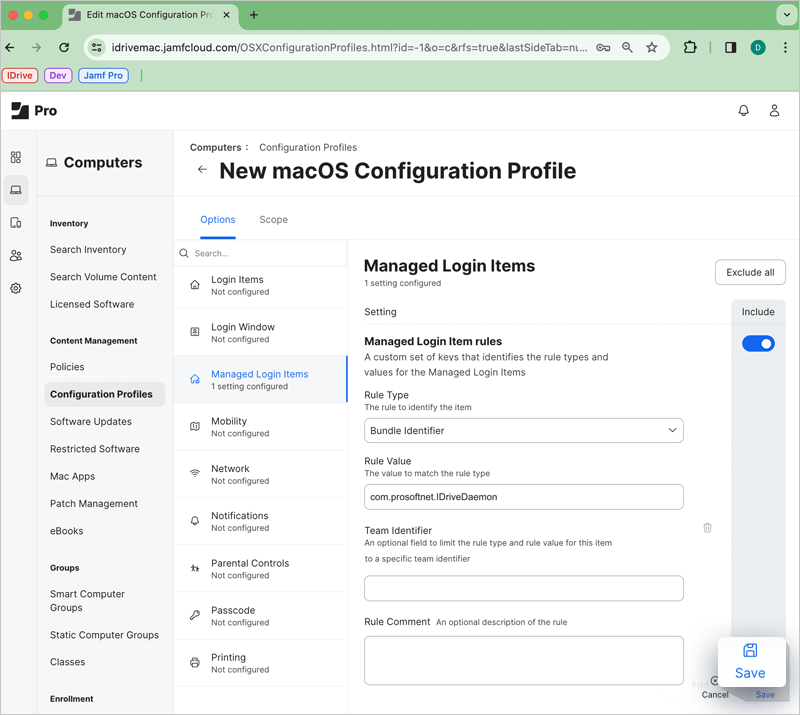
- Add all the configuration details.
- Set 'All Computers' and 'All Targets' under 'Scope'
- Click 'Save'
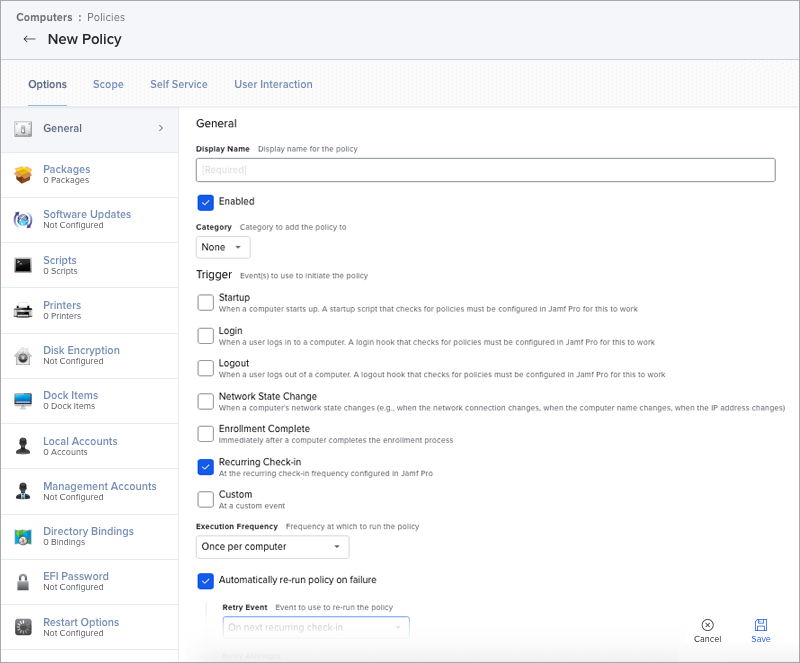
Create a Computer Policy
- Click 'Computers' at the top left of the page.
- Click 'Policies'.
- Click 'New'.
- Use the 'General Payload' to configure basic settings for the policy, including the trigger and execution frequency.
Example:
- Display Name: IDrive360 Deploy
- Trigger: Recurring Check-In
- Execution Frequency: Once Per Computer
- Automatically re-run the policy on failure
- Automatically re-run the policy on failure.
- Click the 'Packages' tab and select the deployable IDrive360.pkg uploaded earlier.
- Click 'Configure'.
- Find your IDrive360.pkg and click 'Add'.
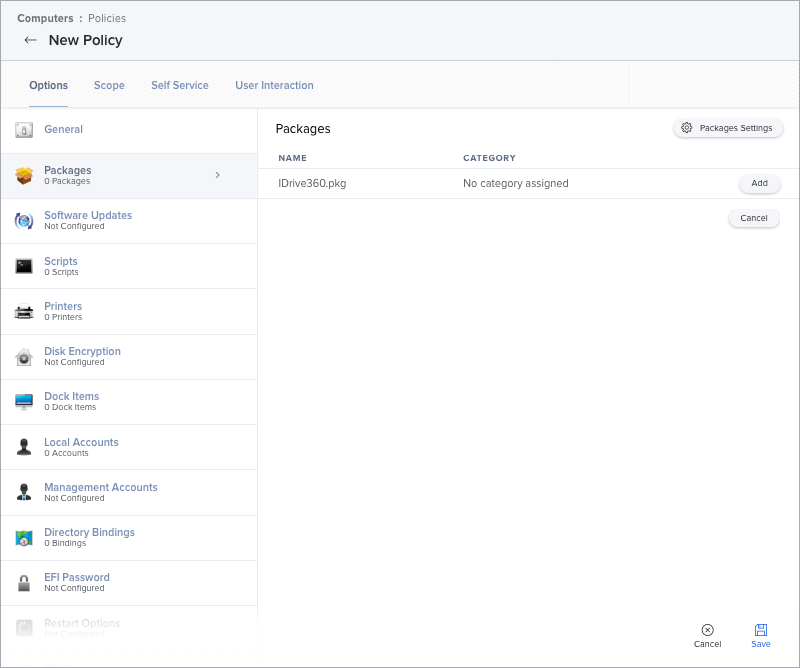
- Select 'Cloud Distribution Point' option under 'Distribution Point' drop-down.
- Ensure that 'Install' is selected.
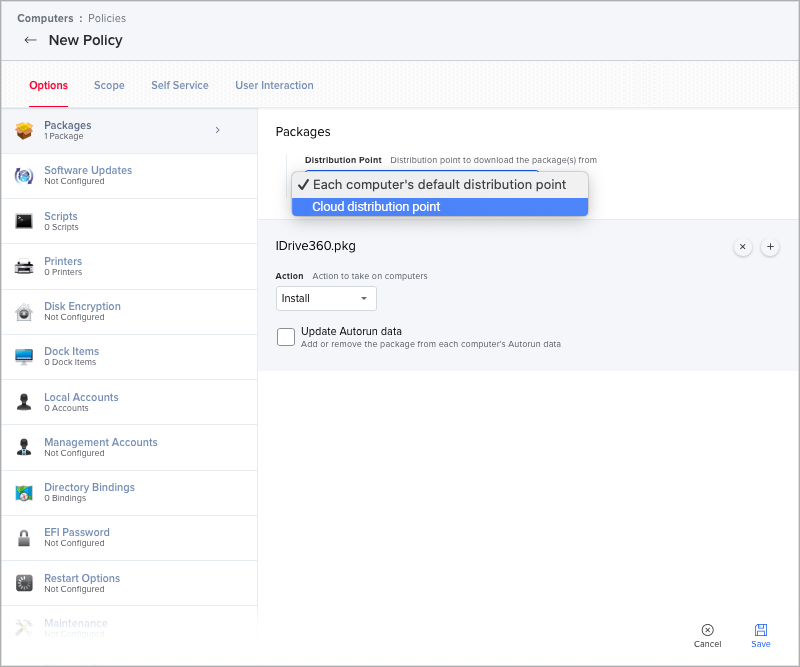
- Click 'Save'.
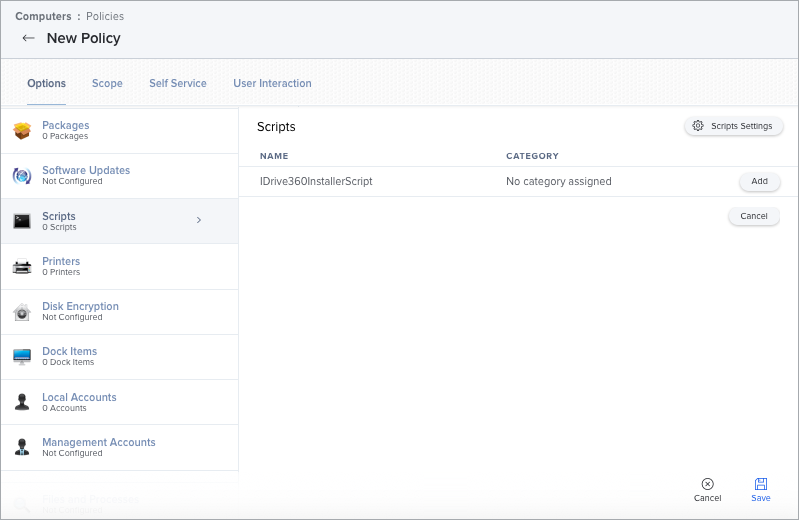
- Click the 'Scripts' tab and select the script that is uploaded earlier.
- Click 'Configure'.
- Find your 'IDrive360InstallerScript' and click 'Add'.
- Enter parameter value IDrive360 full name (e.g. IDrive360_JPwmv149Wi1u2DGcRE7P1726.pkg) under 'IDrive360 Package Name'.
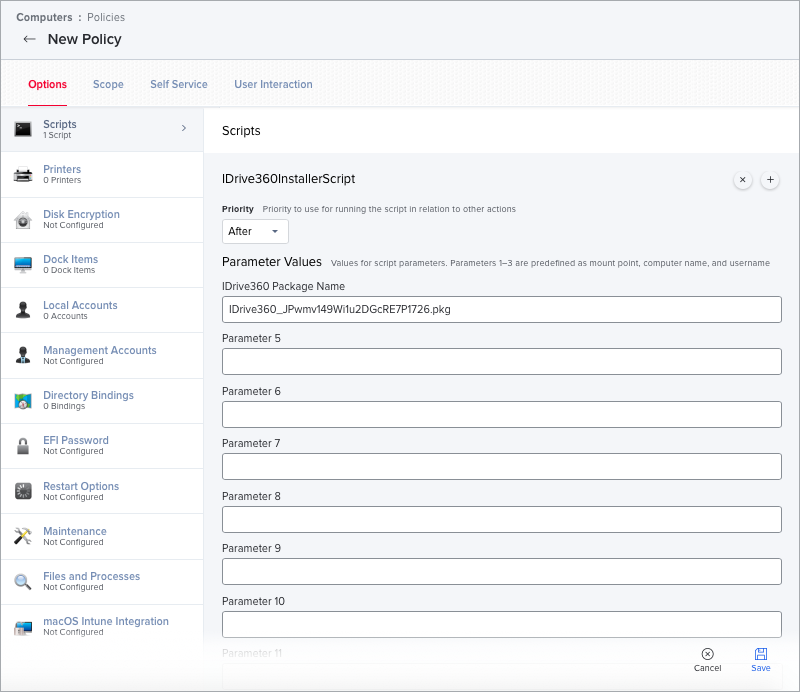
- Click 'Save'.
- Click the 'Scope' tab and configure the scope of the policy to choose computers this should be installed on. If you intend to install this on all computers, you can choose 'All Computers' from the drop-down. Jamf Admins should understand their own scope standards.
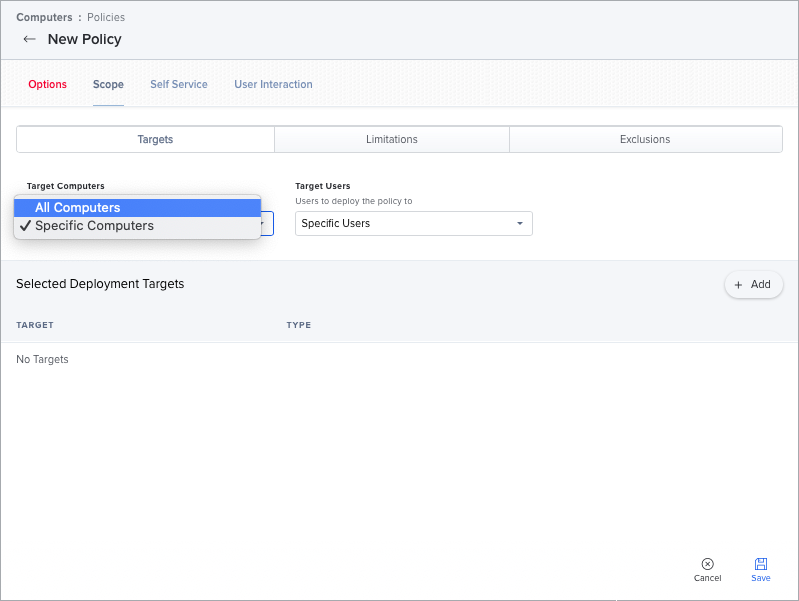
- Click 'Save'.
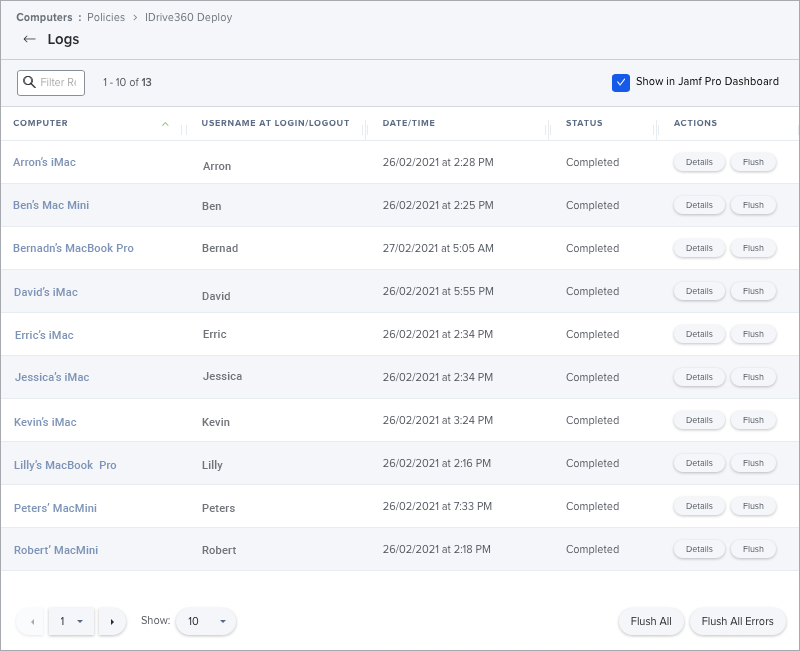
- Under the 'Computers' section, click on 'Policies' and select IDrive360_Deploy’ Policy.
- Click on 'Logs' to see the deployment status of each machine.